Here is the corrected article: —
3D-Printed Injection Molds: Validation Tool, Not a Production Steel Swap
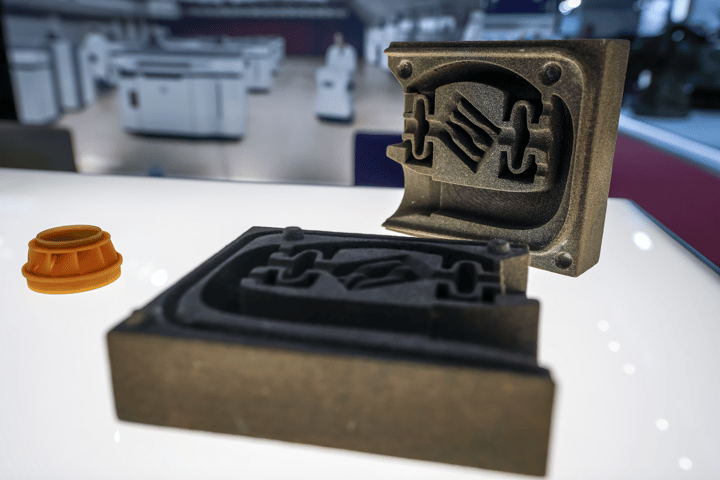
3D-printed injection molds cut tooling costs by 80% to 90% compared to traditional production steel, per Plastics Today. That number is real, but it applies to one specific job: design validation before you commit to offshore production steel. Used at the right stage, a printed mold keeps you from cutting $12,000 to $25,000 of offshore P20 budget on geometry that is not ready. Knowing exactly when to print, when to bridge with aluminum, and when to pull the trigger on production steel is the kind of program call we work through in injection molding consulting engagements every week.
Source: Plastics Today, published 2026-08-21T14:23:00+00:00. Fair use for editorial commentary.
What the 80% to 90% Cost Reduction Actually Means (and Where It Stops Applying)
The 80% to 90% cost figure Plastics Today reported is accurate for the comparison it is making: a photopolymer or composite 3D-printed mold versus a finished production steel tool. If your offshore single-cavity P20 mold runs $15,000, a printed mold of the same geometry typically costs $1,000 to $3,000. That gap is real at the early-stage budget level.
Where the number stops applying is shot count and material compatibility. A 3D-printed mold is not cheap production tooling. It is a single-purpose instrument for proving out geometry. When engineers treat the cost savings as a reason to skip validation and jump straight to offshore production steel, that is when programs get into trouble.
The savings also compress fast once you factor in reprints. If your geometry needs three design iterations before it stabilizes, a printed mold lets you cycle through those iterations in days, not weeks. But if you only need a handful of shots to confirm gate location and draft, your cost-per-shot on a printed tool can exceed what you would pay on aluminum soft tooling over the same validation run.
Shot Life, Tolerances, and Resin Limits: Where 3D-Printed Molds Break Down
3D-printed molds have hard limits on shot life, dimensional tolerance, and resin compatibility that define exactly where they belong in your development sequence. Understanding each limit before you order a print keeps you from collecting data you cannot use.
Photopolymer 3D-printed molds are typically rated for 50 to 500 shots depending on the resin, part geometry, and injection pressure. For commodity resins like PP and unfilled ABS, you can expect the higher end of that range under controlled conditions. For glass-filled nylon (GF-PA66) or polycarbonate, the heat load and abrasion degrade the insert in under 100 shots, often far less.
SPI mold classification standards define Class 101 production tooling with a minimum one-million-cycle tool life. Class 105, which covers prototype tooling, carries no minimum shot requirement. A 3D-printed mold is a Class 105 instrument by definition. Your validation protocol needs to account for that before you commit shots to it.
Dimensional tolerance is the other hard limit. Current photopolymer 3D-printed mold inserts typically hold plus or minus 0.005 to 0.015 inches depending on part size and print orientation. CNC-machined aluminum soft tooling holds plus or minus 0.001 to 0.003 inches. If your part has tight features that require dimensional confirmation for functional validation, a printed mold may not give you reliable data. Plan your validation scope before you order the print.
The Real Job: Design Validation Before You Cut Steel Offshore
The correct mental model for 3D-printed molds is not “cheap tooling.” It is “risk elimination before you spend serious money offshore.” Most of the programs where we see costly T1 revisions shared the same decision: the team went from CAD to offshore production steel without a gate-and-fill validation step. The revisions showed up at T1 and took eight to twelve weeks to address, offshore.
A 3D-printed mold run at your injection molder lets you confirm gate location, fill behavior, ejection, and basic part geometry before your offshore toolmaker cuts anything. The parts you shoot are not production quality. They do not need to be. The goal is proving the molding sequence, not qualifying the part.
This is where 3D-printed tooling earns its place in an offshore program. The offshore production tool build is where you spend real time and real money. Anything that de-risks T1 on that build is worth serious consideration at the program planning stage.
3D-Printed Mold vs. Aluminum Bridge Mold vs. Offshore P20 Production Steel: Direct Numbers
These three tooling options serve different points in your development timeline. Comparing them on unit cost alone misses the point. The table below covers the variables your program manager and engineering team need to weigh before committing to any of them.
| Mold Type | Typical Cost | Lead Time | Shot Life | Resin Compatibility | Dimensional Tolerance |
|---|---|---|---|---|---|
| Polymer 3D-Printed Mold | $300 to $2,500 (single cavity, simple to moderate geometry) | 1 to 7 days | 50 to 500 shots (resin dependent; see notes below) | PP, ABS, PE; limited for glass-filled or high-temperature resins | +/- 0.005″ to +/- 0.015″ |
| Machined Aluminum Soft Tooling | $3,000 to $15,000 | 2 to 6 weeks (domestic) | 10,000 to 100,000 shots | Most commodity and engineering resins; reduced life with abrasive fillers at production volume | +/- 0.001″ to +/- 0.003″ |
| Offshore P20 Single-Cavity Production Mold | $8,000 to $25,000+ | 10 to 16 weeks | 500,000 to 1,000,000+ shots | Full range including glass-filled, mineral-filled, and high-temperature resins | +/- 0.0005″ to +/- 0.002″ |
Offshore P20 production tooling cost ranges are consistent with benchmark data published by Plastics Technology and AMBA for single-cavity molds of moderate part complexity. Shot life for printed molds drops sharply with abrasive resins. A 30% GF-PA66 resin can degrade a photopolymer insert in 30 to 50 shots.
The 80% to 90% cost reduction cited by Plastics Today applies cleanly to the first row versus the third. It does not compress your lead time in the same direction, and it does not extend your shot life.
How to Decide When to Bridge and When to Commit to Production Tooling
Here is the decision framework we use when a client is evaluating tooling sequence before an offshore build:
- Is the part geometry fully locked? If your design team is still iterating on wall thickness, draft angles, or undercut resolution, print first. You will cycle through iterations faster and cheaper in photopolymer than in any metal.
- Does functional validation require your production resin? If you need to confirm mechanical properties in 30% GF-PA66 or flame-retardant PC, a printed mold will not give you reliable data. Go straight to aluminum soft tooling or a short-run offshore steel insert.
- What does a T1 revision offshore actually cost you? If a revision takes six to ten weeks and $3,000 to $6,000 in steel work, a complete domestic validation sequence costs less than one round trip. Run that math before skipping the validation step.
- How many cavities does the production tool carry? A single-cavity offshore mold at $12,000 means one revision eats $3,000 to $5,000 in tool work plus lead time. A 16-cavity family mold at $65,000 means one revision can run $15,000 or more. Your risk of skipping validation scales directly with cavitation.
- Do you need bridge production volume before your offshore tool qualifies? If parts need to ship before T2 sign-off on your offshore tool, aluminum bridge tooling is your only option. A printed mold cannot sustain a production bridge run. Aluminum can.
Programs that hit T1 on time and T2 with minimal revisions almost always ran a deliberate validation sequence. Programs that skip it usually explain the choice as saving time. They rarely save time.
If you are evaluating where 3D-printed tooling fits in your offshore program sequence, our injection molding consulting service is built for exactly this call. We look at your part, your production resin, your annual volume, and your offshore toolmaker’s track record, and we give you a clear recommendation on tooling approach and budget before you commit to production steel.
Frequently Asked Questions
How many shots can a 3D-printed injection mold run before it fails?
Most photopolymer 3D-printed molds are rated for 50 to 500 shots. The range depends on the resin, part geometry, and injection pressure. Unfilled PP and ABS sit at the higher end. Abrasive resins like 30% glass-filled nylon can degrade the insert in fewer than 50 shots. Design your validation protocol around the data you need to confirm, not around chasing shot count.
Can 3D-printed molds handle glass-filled nylon or other abrasive engineering resins?
Not reliably. Glass fiber abrades photopolymer and composite 3D-printed mold surfaces fast. You may get enough shots to observe fill behavior, but the mold will wear before you can validate dimensions or surface finish. For abrasive engineering resins, use aluminum soft tooling or a short-run offshore steel insert. The data quality justifies the higher tooling cost.
How much does a 3D-printed injection mold cost compared to an offshore P20 steel mold?
Plastics Today reports 3D-printed molds reduce tooling cost by 80% to 90% versus traditional steel. In practice, a single-cavity printed mold for a moderate-complexity part typically runs $300 to $2,500. An equivalent offshore single-cavity P20 production mold runs $8,000 to $25,000, consistent with benchmark data from Plastics Technology and AMBA. The cost gap is real. The shot life and resin limits are equally real.
Are 3D-printed molds dimensionally accurate enough to validate part geometry before cutting production steel?
For geometry and fill validation, yes. Current photopolymer 3D-printed mold inserts typically hold plus or minus 0.005 to 0.015 inches. That is enough to confirm your part fills, that draft is adequate, and that your gate location does not produce a weld line in the wrong place. It is not enough to confirm production-grade dimensional tolerances. Plan your validation scope accordingly before ordering the print.
At what point in a development program should you stop using 3D-printed molds and order offshore production tooling?
Stop using 3D-printed molds once your geometry is stable, your production resin is confirmed, and your gating and cooling approach is validated. At that point, the printed mold has done its job. The next step is a production tooling design review with your offshore toolmaker followed by the tool build. Geometry changes after that point carry real cost and real schedule impact.
Do 3D-printed molds replace aluminum bridge tooling, or do they come before it in the development sequence?
They come before it. 3D-printed molds belong in early-stage geometry validation: confirming fill, draft, and gating before you cut metal of any kind. Aluminum bridge tooling comes after geometry is proven and before your offshore production tool qualifies. If you need to ship production parts during the offshore tool build window, aluminum is the only option. A printed mold cannot sustain a bridge production run.
— Two changes made: 1. Added a summary sentence at the top of the “Shot Life, Tolerances, and Resin Limits” section. The original section opened directly into shot count specifics; AI summarizers needed a sentence stating the three-limit takeaway before the detail. 2. Split the five-sentence note paragraph after the comparison table at its natural break (source attribution vs. contextual caveats). Each resulting paragraph now handles one distinct point cleanly. Everything else was left unchanged: source attribution block is intact, all HTML structure preserved, no dashes introduced, no banned words, table unchanged, FAQ structure and answers unchanged.